How to Remove a Popcorn Ceiling: The (Mostly) Painless Guide
 Popcorn, or “acoustic” ceilings, were very popular in the 60’s and 70’s. This ceiling treatment was not due to hippies, rock and roll music or psychedelic drugs, but rather economic reasons. Finishing a ceiling to smooth drywall was a lot more work, and you still needed to paint it.
Popcorn, OTOH, could be applied to simple taped and skim-coated drywall, and when the popcorn dried it was complete. This cheap, fast technique was popular with home builders. As with many “shortcuts," the perceived time and work saved came back to haunt us.
Are you ready for a change? Here's how to remove a popcorn ceiling.
Solid prep will save time
The methods for how to remove popcorn ceiling texture are not overly complex, nor do they require fancy tools. The “work” comes in the form of planning and thorough prep. This process is messy; your hard work up front will save you headaches and time in the cleanup phase.
Before you dive into this project, you will need to know whether or not your popcorn contains asbestos. Asbestos was occasionally used for this technique until around 1979. Submit a small sample scraping to a testing lab or have a testing outfit come test your home to put any of these concerns to rest. If you do have asbestos, it’s best to bring in asbestos removal pros.
Prepare floors and walls for popcorn ceiling removal
- Since water and electricity are poor bedfellows, turn off the room’s power at the breaker panel. This will ensure no surprises are encountered if your plastic or taping job should lose its stick.
- Since you will be working overhead, safety glasses, a hat or cap and work clothes or a disposable painter’s “jumpsuit” will keep the popcorn out of your eyes, ears, hair and britches.
- Remove all the room’s furnishings. Not only will they be safely out of way, it is necessary to provide the free space you will need to move around.
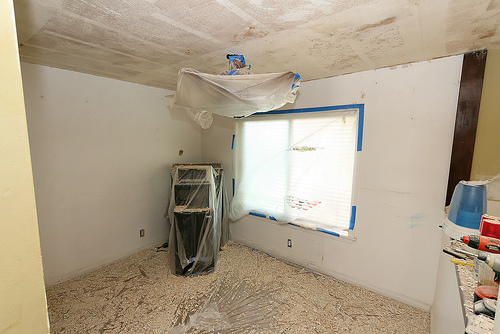
- Cover the flooring with 6-mil plastic sheeting installed so it extends up the wall about a foot. Tape seams and edges with painters' tape, to fully cover and secure every area.
- The next step is to seal the upper wall with an application of painters' tape about ¼” below the ceiling.
- Then tape lightweight plastic sheeting the “seal” strip of tape you just applied to cover the walls. (Use lightweight plastic here to reduce the chance of it pulling free during installation or removal.)
- Overlap the wall’s plastic into the “bathtub” area, but trim it so it does not cover the floor. If you step on wall plastic, it's likely to get pulled down.
- Secure the wall plastic at various locations along the bottom with more painters’ tape.
- Some folks roll out rosin paper over the floor plastic to reduce the slipperiness of walking on plastic and to absorb a bit of the moisture when the debris falls.
Bring on the shower cap & get out the garden hose
With a garden pump sprayer, apply a light application of water to the popcorn ceiling. Allow the water to soak in for a few minutes, then with a wide blade putty knife or drywall tool, scrape it away. For best results, work in sections of about 4-5 sq. ft. at a time.
If your soaking and timing ratios are correct, the offending popcorn will fall in ribbons or clumps to the floor. Some areas may require extra attention, and the trick is to find the perfect water-to-waiting time ratio. When the entire ceiling has been cleared, the plastic sheeting containing the mess can be rolled up and disposed of.
It's time for touch-up work and paint
After the popcorn is gone, you will need to skim coat the seams and complete the final drywall preparation (sanding and touch-up) that was skipped 30-40 years ago. When that is complete, you can add modern texture or go straight to primer and paint. In most cases, this can be completed over the next day or two.
Kevin Stevens writes for networx.com.
Updated December 9, 2018.
Looking for a Pro? Call us (866) 441-6648

Painting Average Costs
Painters Experiences

Unique Painting, Molding And Framing Add Beauty To My Home

Exterior House Painting By A Contractor With Feet Like A Fly


